Friday, May 23, 2014

Inspired by Fashion: Zebra Nails (#1)

Hey! Long time, huh. It seems like everytime I am about to be constant is posting something always pops us. This time it is work, so I hope you guys do not mind and hate me for not being constant. I have tried to post these for about two weeks now, but working up to 12 hours on my feet is exhausting. When I come home the last thing I think about is my blog. Any who, Fridays I will be posting for sure, and at random times through the week if I am off early.

So on to the nails; these are the first is a four week  mini series I will be starting today. I found the picture below on Instagram and I liked it so much I decided to base four manis of it. I do have to apologize for my cuticles...I work with my hands all day and they tent to get really jacked up. So much actually that I've had to keep my nubs as of lately. I do try to moisturize my cuticles as much as possible but they still remain dry. If you have any suggestions for a long lasting conditioning cuticle oil please let me now!


So to start off, I started with the top right bikini. I really liked the simplicity of it and decided it would be best to start on that one. 

Colors/Tools Used: 
Sinful Colors  in Snow Me White (White)
Sinful Colors GelShine in Sailors Delight (Hot Pink)
Sinful Colors in Black on Black (Black)
Thin Stripping Brush


My brush wasn't cooperating with me :( I think i am going to have to get a new one, or thin this one one some more.

I cannot wait to share the next mani with you guys! If you want to join me please do so! Share your manis with me on Instagram and I will share them on my blog! :)


-Until Next Time <3

Thursday, May 8, 2014

Spring Roses


Hey all! It's been a while..I have been very busy and well the last thing I have time for is my nails. As of lately I have had a bit of time at night, so I have tried to do a few tutorials/nail looks. I just need to find the time to edit them now, haha. 

Anyways, today I bring you these super easy and colorful nails. These were inspired by the roses my dad has planted around the house. Ill have to wait until the morning to take a picture but they are just beautiful!

This design only took about 10 minutes so it is perfect for those of us who don't have much time. At first I wanted to have a green background to simulate the roses being on grass but I decided against that because (in my opinion) the sheer pink background makes the colors stand out more.
What do you think?


What I Used:
Base- Sally Hansen Diamond Strength in Sheer Bliss #22
Dots- Sinful Colors in Snow Me White #1
Roses- Red: L.A Colors Color Craze in a red color (Sorry, label is missing)
Orange: Sally Hansen Xtreme Wear in Sun Kissed #150
Yellow: Santee in Yellow #22
Leafs- Sinful Colors in Innocent #944
Dotting Tool
Small Brush and Polish Remover


Apply your base coat, and a layer or two of a sheer polish. I used two coats.

Using the bottom of your brush, create dots where you want your roses.

Using your dotting tool, start to create your roses. I have a tutorial on roses HERE.

Add leaves to your roses, and clean up your edges with using a brush damped in acetone.

Voila! You are done!

I am honestly really happy with these. I know my roses are not the best, but I still love them. They are just so bright and spring to me.

If you give these a try, tag me on Instagram!

-Until Next Time <3


Monday, April 21, 2014

Broadway Nails imPRESS Press-on Manicure

Hi all! I recently received these imPRESS On nails by Broadway Nails from Influenster, and I love them!  Below I will list a few things that sold me on these nails as well as the two that bothered me. I will try to keep this post short because I have been told I go on for long.
 
 
Pros:
Lasted a full week
Extremely shiny
Easy to put on
Easy to take off
Wont come off in the shower, or while washing dishes
Designs, studs and such can be added
Come in many colors, and patterns
Affordable
 
Cons:
Limited sizes
Snag on a few things (hair specially)
 
I do think that every girl needs at least one of these sets for emergency situations. You can achieve a flawless manicure in under 5 minutes! I do not recommend these for girls with really curvy or wide nail beds because these nails will not fit. These are flexible enough to curve with your natural nail but there is no way to stretch them. If these do not lay "flat" on your nails, you will have a gap between these and your natural nails. It is not noticeable form far, but up close you will be able to see it. That little gap will also cause a lot of snagging, and the nails are more likely to fall off sooner because water will dissolve the glue. Speaking of which, the glue is strong! DO NOT try to take these off without first soaking for a few seconds in acetone. Trying to pull these off can cause damage to your natural nail.
 
Overall, I really enjoyed these. They provided me with an awesome mani for a full week. I will definitely be purchasing these in other colors and patterns.


Have you tried these? Let me know down below!
-Until Next Time <3

Thursday, April 17, 2014

Influenster: UniVox Product Reviews

Hi guys! Today I bring you reviews for a few products I received in the Influenster UniBox. This box took so long to arrive at my door that I had lost hope of ever receiving it. When it did get to my door you can just imagine how happy I was! I was/am in love with every  product in this box, even the two that did not work out for me, haha.
 
I will try to keep this post short as I know writing many reviews in one can be long.
 
 
Let's get started!
 
 
Rimmel London Stay Matte Liquid Mousse-Foundation / $4.99-$5.49/ @RimmelLondonUS/ Facebook.com/RimmelLondonUS
 
This was the star of the box for me. It did not match my skin but I still tried it and WOW! This one blew me away! It is extremely lightweight and provides great coverage. This color matched my sister so I had her try it and these are her thoughts: This foundation provided amazing coverage with the least amount and it is lightweight. This is not "cakey" at all. This foundation also stays matte all day long. I have combination skin and sometimes the oil is too much for my other foundations but this one had no problem staying on. Shine has meet its match!


 Broadway Nails impress-On Manicure/ $5.99 Solid Colors/ $7.99 Pattered Nails/ +BwayNails /Facebook.com/bwaynails
 
I will have a complete review for these HERE. Really quick, these work great for when you are on the go and don't have much time to paint your nails. These are easy to apply and last a week. They are not for all nail types though. Click HERE for more. (It seemed appropriate to do a separate blog post since this is a Nail related blog)
 
 
Pilot Acroball PureWhite/ $4.59 per 3-pack/ @PilotPenUsa/ Facebook.com/PilotPen
 
How does one even review a pen? Haha. I did like this pen though. I like the contrast between the yellow and the white, it provided a nice pop of color. The ink is smooth and does not clump. I also liked that I could write for a long time without my hand cramping.
 
Playtex Sport Fresh Balance /$3.99-$4.99/@Playtex_Sport/ #PlayOn /@PlaytexSportandGentleGlide
 
These tampons are great for girls who love sports. The tampons are not uncomfortable at all and they "move" with you. I had heard that the scent in these could cause a reaction down under, but I was fine. I know, a bit TMI, I apologize. These are just like any other tampons though, so I am not sure what else to say...Hmm... I do like that these are not big either. I have seem tampons that are "regular" and are wider then two of my fingers! Haha.
 
 
Red Rose REAL TEA Premium Water Enhancer/ $4.49/ @ShareRedRoseTea/ Facebook.com/RedRose
 
If you have not tries this water enhancer, you must. It has great flavor, and it looks cool when you are squirting this into your water. I know that there is a million of these, but this is the first time I have seen a tea one. I am a lover of tea so this one is right up my alley. I love that this product is made from REAL TEA! There is zero dyes or coloring!
 
 NYC Expert Last Lip Color in Forever Fuchsia/ $1.99/ @NYCNewYorkColor/
 Facebook.com/NewYorkColorCosmetics
 
This lipstick is amazing! It glides right on and it is silky, smooth and rich in color. I believe right now there are 20 shades and they are all worth buying. I love that this lipstick lasts about 6 hours. I really enjoy not having to reapply every two hours, haha.


If you have tried these products, let me know down below! Also, if you'd like an invitation for Influenster let me know! I have 4 left :)
 
-Until Next Time <3


Disclosure: I received these for free from Influenster in exchange for a review.

Thursday, April 10, 2014

Easter Lamb Cupcakes

 Aren't these just the cutest?!
 
Hi dolls! Today I bring you this really cute cupcake DIY for Easter. I first saw these in a Martha Steward cupcake book and fell in love with there cuteness! These are really easy to make and do not require much. Anyone can make these in a matter of minutes.

-Pink medium sized marshmallows
-Small white marshmellows
-Red heart sprinkle
-Chocolate Chips
- Vanilla frosting, or marshmallow fluff
-White cupcakes

-Cut mini marshmallows in half
-Cut the pink marshmallows in half going across the marshmallow from one "corner" to the other "corner"
-Frost your cupcake with desired frosting and place about 8 mini marshmellows on the edge, and 4 a top of that.
-Place your ears, and then fill the top with two rows of mini marchellow
-Add an inverted heart as the nose, and two chocolate chips for the eyes


I will be adding a video for this DIY in a few hours.

I hope you guys give this a try, and if you do show me on Instagram! 


I will be (hopefully) creating a few more Easter treats before the actual day!
If there is anyting youd like to see, please let me know!


-Until next time <3

Wednesday, April 2, 2014

Vintage Rose Mani


Hi guys!

So the other day I was browsing through Google and found the image below. I completely fell in love with it and decided that not only did I need it as my tablets and phones wallpaper, but that it needed to be on my nails too.

There is just something about this image that really caught my attention. I think it is the combination of colors, and the fact that this image contains some of my favorite things-roses and polka dots.

At first I really wanted the roses on every nail but decided against that because I thought it would be too much, what do you think? Overall I am in love with my nails. I absolutely love the vintage-y look of them, and adore the combination of the colors. 

I am positive I will be recreating these again, and I will definitely be experimenting with other color combinations! 

Do you think I captured the essence of the wallpaper in my nails?

-Until Next Time <3


Colors Used:
Base- Sinful Color in Mint Apple
Polka Dots- Sinful Colors in Snow Me White (#1)
Roses- Sinful Colors in Thimbleberry (#108), Sailors Delight (#1235) ans Spoiled in My Silicone Popped (#S007)
Leafs- Sinful Colors in Innocent (#944)


Thursday, March 27, 2014

Nayll Custom Polish Review + More!

Hi guys! I am very excited to bring this this polish review today! I am over the moon to say that I had the opportunity to create some polishes a couple weeks back. When I was contacted by Sara, the owner of Nayll Polish, asking if I would be interested in creating some polishes I could not say no. I've always wanted to create my own polish but never had the right resources available, until now. 

I am so in love with the idea that Sara has brought forth I just had to share with you all!
Creating the polishes was not easy! She offers many base choices, micas, and glitters to choose from that I had to visit the site a couple times and contemplate on what I wanted, haha. Made me feel a bit crazy so I can only imagine what Indie polish makers feel! 

Once you know what you want the process is simple; pick a base (shimmer or glitter), pick a color for your base, choose a mica or two, or some glitters, name your polish, and click add to cart. See, so simple! 

I have to say that I impressed by the results. The three polishes I created were exactly what I wanted. I could not be any more happy with them, and I am already creating mixes in my head, haha.

The polishes were just as I expected, and nothing short of that. They apply easily, and dry quick. I only had one clump a bit but I will explain my theory as to why a little later in this post. The polishes also lasted about a week with no chipping! I feel like the polish would have lasted longer if I didn't have so many chores around the house everyday.

I could ramble on forever, so lets just get in to the polishes!


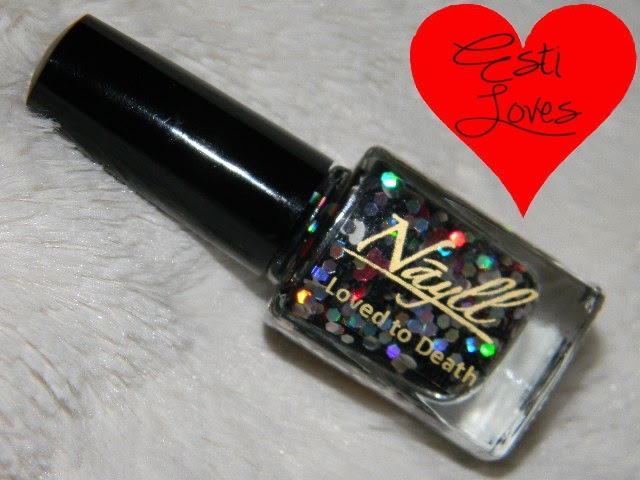
The polishes I created: Bri's Heart Beat, Loved to Death, I Am From the Wind

Polishes from her line: The Fast and the Blurriest, Studio 54

Top coats from her line: Smooth It Out Glitter Topcoat, Holy Holo Top Coat


This polish had holo hexes, skulls, and hearts all in a black jelly base. I decided to wear this one over a red because,well, I like the way it looks. This is by far my favorite polish! I don't mean to toot my own horn, but I think I made a beauty, lol.

This is one coat over a Sally Hansen red polish. There was no fishing for glitter! 


I Am From The Wind was the only polishes that clumped when I applied it. I believe it was because the glitters I chose were the same size and too many of them. I did try to smooth it out with the brush but failed. I still love this polish though, I just think of it as a textured polish. The name for this one came from one of my favorite movies; One Night with the King. This polish included glitters in turquoise and white, as well as white shards.

 
This is two coats over a Santee white polish.

Bris Heart Beats is a strawberry jelly polish with fine red glitters and black hearts.My sister, Brisa, names this one after her and her heart. She said that day she was feeling dark. This one screams Watermelon Hearts to me but she really wanted a polish with her name, haha.

Two coats over a Sally Hansen nude polish. As you can see, for two coats, this has great coverage! I was expecting to need more because of the red glitter but I was wrong. I also did not have to fish for the heart glitters.

This one here is from Nayll's already made polishes. Honestly, I choose this one because the name reminded me of The Fast and the Furious and having a boyfriend who loves cars, this polish talked to me! This one features fuchsia dots, holo hex and blue squares. I absolutely love the sparkle in this!

Two coats over a Sinful Colors blue. Again, no fishing for glitters!

Studio 54 is a gorgeous gold glitter bomb. My absolute favorite part is the stars, haha. This one is packed with holo gold glitter, making it so fun to look at.


Two coats over a Sinful Colors pink. I was going to swatch this over black but the pink seemed more fitting for my mood that day, girly. And once more, no fishing for the glitter!

I absolutely cannot wait to make another polish! I hope you guys are inspired by my creations and give Nayll a try. I can guarantee that you will not be disapointed! :)


If you'd like more information about Nayll, or if you'd like to create your own polish head on over to:


-Until next time my loves! <3


Monday, March 17, 2014

Colgate Optic White Review

Hi all! Long time since I've written. If you follow me on Instagram then you know I had given up blogging for a while. I was struggling with some things and my focus was not where it was supposed to be, but things have changed in the past couple weeks and I am back! I have a couple posts planned for the next few weeks, and I hope you will like them! Also, if you have any requests please let me know!

Any who, about two weeks ago I received a package containing the Optic White toothbrush and toothpaste from Colgate. I had heard about this a couple times, and had seen it at my local shops, but completely ignored it. I wish I hadn't. Since I have used this, I have noticed my teeth whitening. 

I find this system to be easy to use, and well worth the money. Brush, whiten and go; it is that simple. 
I do have to say that the first time I used the brush I hated it! The package said the bristles were soft, but they were far from it. The bristles were very stiff and rough on my teeth. I almost didn't want to finish brushing the first time. Luckily, the bristles soften up by the third or fourth use. There is nothing, in my opinion, extraordinary with the toothbrush. To me, it is just like any other toothbrush out there. The only thing that sets it apart in that it stores the whitening pen.

The whitening paste that comes with this is to be used after brush, and left on your teeth. I was a bit hesitant to use it because from past experiences the whitening pastes leave a nasty taste in my mouth and make my teeth sensitive, but it was not the case with this one. The paste goes on smoothly, and it is easy to spread with the gripped tip of the pen. Also, the paste does not leave a nasty taste in your mouth; I found it to be a bit sweet. Another thing that was important to me was the feel the paste would leave and I was surprised that it couldn't even tell I had it on. The only time I knew was the first time and the first few minutes, after that I could not tell it was on. The paste did not make food make taste gross either.

I highly recommend this system to anyone who wants to whiten their teeth. It is inexpensive, compared to other whitening systems, and easy to use. It takes no more than 5 minutes of your day! 
I would show pictures of the whitening process, but my teeth are not perfect and it is something I am conscious about, sorry! But I can guarantee that you will see a difference, and that you will love it. 


Thanks to Influenster for sending me this product for free in exchange for a review!

-<3

Tuesday, January 28, 2014

Black Label Nails Polish Review+Swatches


Aren't those bottles just the cutest?! These three beauties are by Black Label Nails polish by Jennifer. I was so happy when she let me watch/review for her, lol. I did not get to pick the colors, but I love them! She sent me two solids, and a glitter topper to test/review/swatch.

When I first opened my package, it was love at first sight. I absolutely love the square bottle (these are minis), and the label. The label is just the cutest! I love anything with skulls, so this is just...love. Haha!


The polishes she sent me: Sick Hearts, Supernova Champagne, Silver + Cold.

 Sick Hearts is a glitter topper with blue hearts and hexes in grey,blue and white.

I am not a big fan of glitter toppers, but I loved this one. First of all, it as hearts. I have a couple of other polishes with heart but I always have to fish them out. I don't like that! I was so happy when at the first swipe of this I had two hearts on my nails. I also really liked that the glitter was easy to spread on, no need to dab it on. 


 Two coats of Sick Hearts over Silver+Cold. No top coat.

__________

 Supernova Champagne is such a pretty duo chrome. It has a silver look in the bottle, with hints of a brown base. I don't know that this picture does the colors justice! 

This one is my favorite! Depending on which way you hold the bottle, the polish looks silver or a silvery brown (if that makes sense). The polish applied very well and I had full coverage with two coats. It was a bit streaky at first, but It was due to the weather (cold). Once it was at room temperature, it went on even and super smooth. The color shows well even in one coat, and it is easy to layer in case you want even more color.

Two coats of Supernova Champagne, no top coat.
________

Silver + Cold is a blue chrome color. This one also has a silver/rainbow shimmer to it in the light.

Just like Supernova Champagne, this one was super easy to apply. I, again, only, needed two thin coats to achieve complete coverage and get the color I wanted. I really liked that this polish goes on light because it makes layering much easier. I can go light or dark depending on the amount of coats I add. 


Two coats of Silver+Cold, no top coat.

-----

Overall I give these a 10/10. I like that they feature a flat brush, and do not take ages to dry. In my opinion they are pigmented enough,and the colors are true to the bottle in two coats. Oh, and these don't have a nasty smell to them either. 

I recomment you guys go and check her polishes out! As of right now she has 10 listen on her Etsy, and let me tell you they are too cute! If you'd like to see swatcher for the other 7 polishes head on over to her Instagram


If you'd like to purchase your own, you can find them here:
Instagram: BlackLabelNails

A huge thanks to Jennifer for these beauties! 

-<3