Monday, July 29, 2013

Braided leather bracelet

Hey guys!  Don't forget the giveaway is still open!!!! Click here to be taken to that post.
 
 
Doesn't that look cool? Maybe I am the only one that thinks so haha
I really how this bracelet looks, even though its just a simple braid.
  •  5 pieces of leather cord, about 10 inches
  • 2 ribbon end clasps
  • 2 jump rings (3 if adding a charm)
  • lobster clasp
  • flat pliers
 
 Line your cords inside your ribbon clasp. It helps to add a bit of glue to hold them down, and press it closed between flat pliers. If you did not add any glue, press down hard. You really want the little teeth on the clasp to grab the cord.  Now, braid your cords.

I paired the two edge cords together, leaving the middle one (purple) as a single.
 
 When you reach the ends, measure around your wrist and cut. And again, add your ribbon end clasp. Lastly, add your clasp. And you are done!!!!


Sorry that this is such a short and simple post. I am having some internet and computer problems.
I hope you at least enjoyed it!!!!!


Wednesday, July 24, 2013

Braided button bracelet

 Aren't these cute?
 
These are perfect for stacking and the button makes them stand out. I love these bracelets because not only are they super easy to make, but you can make a lot of them in a couple minutes!
I remember when I was in high school, I liked to make the knotted friendship bracelets, but my fingers would end up hurting so much after the first one. Lets just say I never could make more then two a day, haha. Now with these, I can make at least 20 in half an hour!
 
 
 3 different colors of craft thread (40 inches each)
A decorative button
Clear glue
Pretty easy, fold your threads in half and make a knot in the middle leaving space for your button to fit. (Picture below)
Now, braid it! Braid about 7inches. Make a knot, add your button, make another know to secure it, and add glue to that knot. Cut off the excess thread.

Viola! You are done!
See, I told you it was pretty easy! The glue on the knot, is to keep it from coming undone (it's happened :( ), but it is not necessary.
 
I hope you guys enjoyed this post and try it out!
BTW,  if anyone is interested I will have a couple kits to make these in my miiduu store in the next two week or so!
 
Also, don't forget to enter my giveaway! Detail on the post below!
-Sunshine

Tuesday, July 23, 2013

GIVEAWAY!!!!!! (Closed!)

Update!!!!
All you have to do to win is leave your name and email down below! No need to follow me on Instagram.

You guys voted and I listened!
To start this off, I want to say thank you to all of you who view my blog, and follow it. It really does mean a lot to me that someone would take their time to view what I have to post. THANK YOU GUYS SO MUCH!

So, for this giveaway I decided to include supplies for bracelets. The reason being that the next few posts will be on just that.; bracelets. I also included a few extras :)


Onto the rules and prizes:
PRIZES


1st prize winner

2 9x9 pieces of floral fabric
11 decorative buttons
2 studio glitter glues (1 white, 1 black)
4 Ink pads (red, white, lime green, silver)
Yellow picture frame
A baggie of plastic pearls
a baggie of plastic golden pearls
4 small clothespins
3 word beads (forever/special , secret/beauty, believe/always)
2 small mirrors
Letter beads (peace, love)
1 ring blank
1 small plastic vial
Plastic lace ( yellow, white, pink, glitter, blue/green, glow in he dark)
Black leather cord
Craft thread ( light purple, dark purple, yellow, blue, pink)
Charms (feather, large star, small star, large gold star, butterfly, kissing lovers, laugh often, USA, 2 small gold hearts, 2 keys, 2 music notes, moon, leaf)


2nd prize winner

2 Studio Glitter Glues (1 black, 1 white)
1 blue frame
A baggie of plastic gold beads
A baggie of plastic pearls
4 decorative buttons
1 piece of black leather cord
Plastic cording in red, pink, white and glow in the dark
2 small mirrors
Letter beads spelling LOVE
2 small clothespins
5 pieces of woodies
6 square brads
2 Studio G Inks ( 1 silver, 1 red)
Craft thread (purple, yellow, and magenta)
Charms (feather, large star, 2 keys, music note, USA, gold heart, butterfly, leaf, small star)


RULES

All you have to do is follow me on instagram (desertrose77), and leave your instagram name down below! You have from today until July 30th to enter!


The winners will be announced on Instagram on JULY 31.
Both winners will be chosen at random using random.org.
THIS GIVEAWAY IS OPEN WORLDWIDE!
There will also be a surprise gift in them :)
I hope you guys enter, it really is super easy this time, it only take a second to click that follow button :)

There will be future giveaways so I hope you guys keep on coming back and like what I post!

HAVE A GREAT DAY!


Saturday, July 13, 2013

DIY- Washi tape light switch cover


  •  Washi tape
  • X-acto knife
  • sandpaper (Optional)
  • mod podge and brush
  • embellishments (optional)


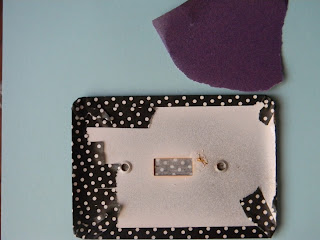
 1. Add strips of washi tape on the whole surface of your light switch cover. Start on the edges, leaving half of your tape hang off the edge. This will ensure it is easier to cover any round corners you have.


 2. Once you have the front covered, turn it on its back and either pull back the excess tape or sand it off.

3. Next, with your knife, cut out the middle. It is easier to cut if you only have one piece of washi tape covering the hole.


4. Lastly, you want to apply mod podge to the front. This will seal the washi tape. You want to add at least two coats.

5. Once it is all dry, just push your screws threw the tape CAREFULLY. I didn't have a problem with ripping, but if you do, place en embellishment over, or a bit more tape. 


THE FINISHED PRODUCT:
 Once I had it back in its place, I added a bow and a rhinestone to the screws with tacky glue.


Hope you enjoy this tutorial and if you try it out I would love to see a picture!
Send any mail to : precious.desert.rose@gmail.com


Wednesday, July 3, 2013

DIY- Galaxy Nails

I know these aren't as pretty or nicely done as soon of the ones you might have seen, but I think you can get the idea of how to do these. Hey, you might end up with a better looking galaxy then I did.
When doing these nails, the key is to be quick and not let the colors completely dry so that when you add your top coat they will blend. The blending is what gives you that galaxy look, having rough spots isn't pretty haha.
  •   black nail polish (Wet N Wild in Black)
  • blue nail polish (Sinful Colors Aquamarine)
  • white nail polish (Sinful Colors Snow Me White)
  • purple nail polish (Sinful Colors Lets talk)
  • glittery nail polish ( Santee Copper Kiss Glitter )
  • sponge (cosmetic sponge)
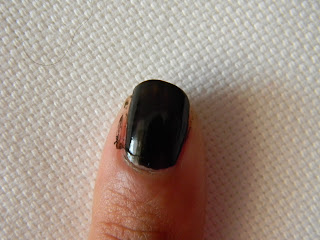
Paint your nail a dork color, I chose black. Let this dry completely.
With a sponge, grab a bit of white and dab it on. You want one area to have a bit more to be your focus point, sorta.
While the white is still a bit wet, sponge on the blue. You can add as little or as much as you like.
Next, dab on some purple while the other two colors are still a it wet. Again, add as little or as much as you like.
   Lastly, add a glittery top coat to assimilate the stars.
If you attempt these, I would love to see a picture.
Please send any requests, pictures, ideas and whatever to precious.desert.rose(at)gmail.com